基础依赖
我在 Windows 下管理各种软件包包使用的是 Scoop,具体如何使用参考这篇文章即可,首先执行 scoop install gcc-arm-none-eabi openocd git mingw make 命令来安装非图形化的软件,而后按照以下网址下载安装 Vscode,CubeMX。Scoop 会自动帮助配置系统环境变量,如果是自己手动安装,记得进行添加。
MakeFile
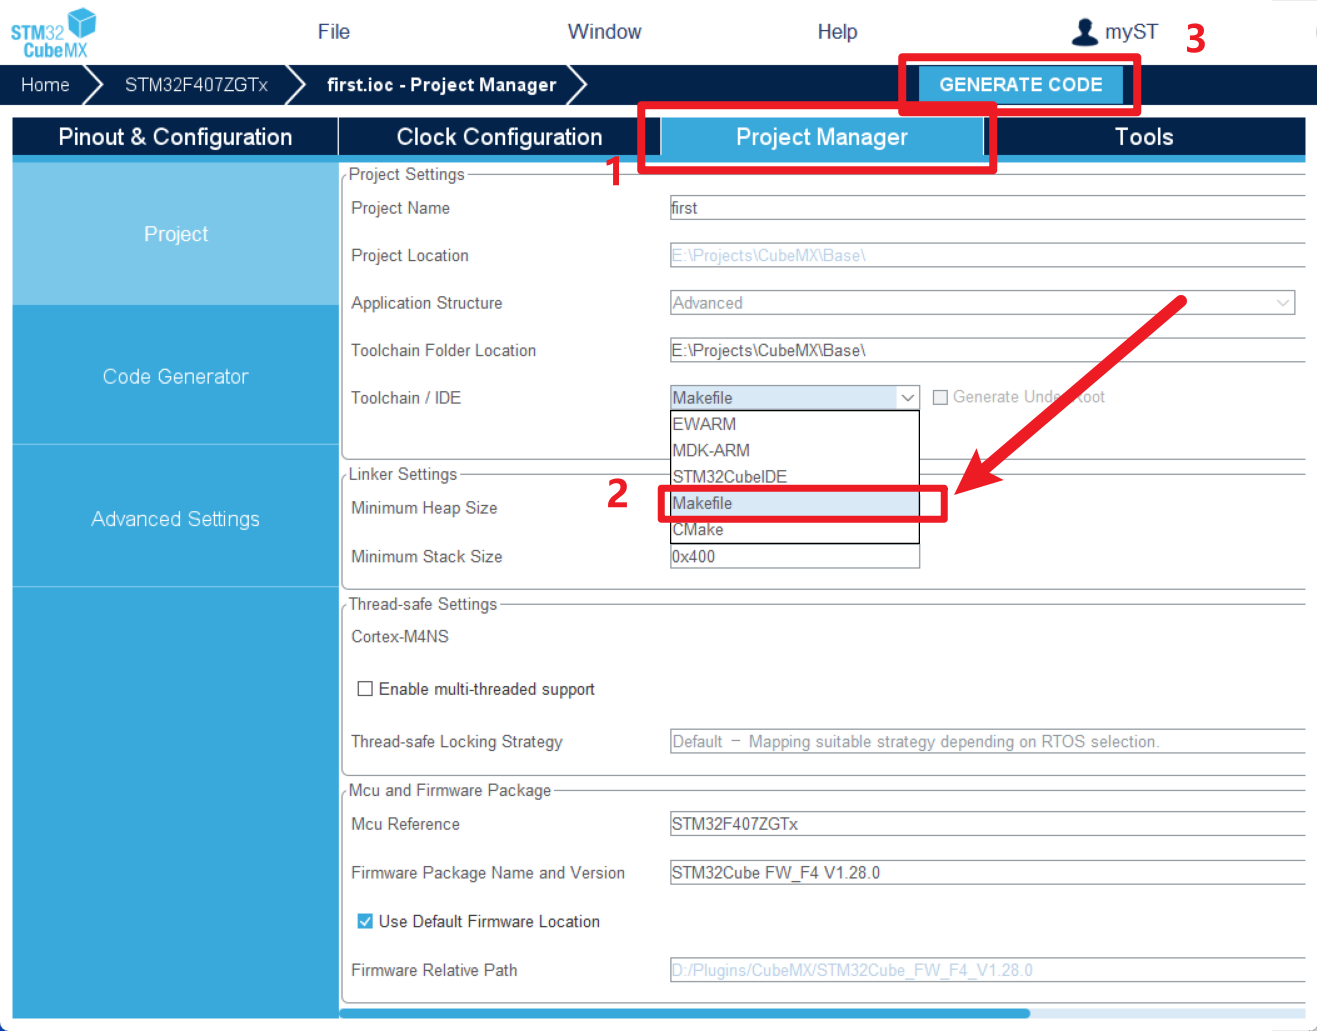
在配置完基础的管脚,时钟之后,在 Project Manager->Project Settings->Tool Chain 中选择 Makefile,如下图所示,而后点击 Generate Code

配置环境
用 vscode 打开上述创建生成的文件夹下的 .vscode 文件及下点击 运行->调试 也可以点击快捷键 F5,在弹出的选择框中选择 C++(GDB/LLDB) 而后选择 gcc 即可,此时会报错,但是也会帮我们生成创建 c_cpp_properties.json 文件(以下称之为配置文件),task.json(以下称之为任务文件),launch.json(以下称之为启动文件),下面分别对这几个文件进行配置
配置文件
打开配置文件,我们在其中可以看到 Path 和 Defines 两项,这时我们打开自动生成的 Makefile 文件,在其中找到 C Defines 和 C Includes 两项,将 Includes 部分去掉 -I 文件中加入到配置的 Path 以及 Include Path 属性下,同时将 Defines 部分去掉 -D 加入到配置文件的 defines 属性下,此外应当在 Include Path 中加入 gcc-arm-none-eabi 对应的库路径,此时 Vscode 应当就支持了代码的自动提示以及查错功能。
配置完之后的内容大概如下所示:
1
2
3
4
5
6
7
8
9
10
11
12
13
14
15
16
17
18
19
20
21
22
23
24
25
26
27
28
29
30
31
| {
"configurations": [
{
"name": "Win32",
"includePath": [
"${workspaceFolder}/**",
"D:/Scoop/apps/gcc-arm-none-eabi/current/arm-none-eabi/include",
"D:/Scoop/apps/gcc-arm-none-eabi/current/arm-none-eabi/include/c++/13.3.1",
"D:/Scoop/apps/gcc-arm-none-eabi/current/arm-none-eabi/include/c++/13.3.1/arm-none-eabi/thumb/v7-m",
"D:/Scoop/apps/gcc-arm-none-eabi/current/arm-none-eabi/include/c++/13.3.1/backward",
"D:/Scoop/apps/gcc-arm-none-eabi/current/arm-none-eabi/include/sys",
"D:/Scoop/apps/gcc-arm-none-eabi/current/lib/gcc/arm-none-eabi/13.3.1/include",
"D:/Scoop/apps/gcc-arm-none-eabi/current/lib/gcc/arm-none-eabi/13.3.1/include-fixed"
],
"defines": [
"_DEBUG",
"UNICODE",
"_UNICODE",
"USE_HAL_DRIVER",
"STM32F407xx",
"__STATIC_INLINE=",
"__NO_RETURN="
],
"compilerPath": "D:/Scoop/apps/gcc-arm-none-eabi/current/bin/arm-none-eabi-gcc.exe",
"cStandard": "c11",
"cppStandard": "c++17",
"intelliSenseMode": "${default}"
}
],
"version": 4
}
|
任务文件
打开任务文件,其中主要是 Vscode 用于 cortex 的任务配置,一键下载,调试,其中各个配置项的含义如下
| 配置项 |
含义 |
| tasks |
包含的任务 |
| label |
标签,可以理解为任务的名称。 |
| type |
表明任务是作为一个进程运行还是在 shell 中作为命令运行 |
| command |
要执行的命令 |
| args |
命令的参数 |
| option |
是其他命令选项,可以删掉不管 |
| problemMatcher |
问题匹配程序,可以不管 |
| group |
用于分组,可以不管 |
| detail |
细节描述 |
| dependsOn |
依赖于某个任务,指定该属性,可以在运行当前任务前先执行指定任务 |
终端输入 openocd -h 查看帮助可以看到,用选项 -f 来指定配置文件,用选项 -c 来运行指令,那么思路就是:-f 来指定调试器类型和芯片型号等,-c 进行烧录,在 opneocd 的安装目录下 OpenOCD/share/openocd/scripts"(linux 下在目录 /usr/share/openocd ) 下可以看到有很多写好的配置文件,我们可以在 interface 文件夹中选定调试器,在 target 文件夹中选定芯片型号:
1
2
3
4
5
6
7
8
9
10
11
12
13
14
15
16
17
18
19
20
21
22
23
24
25
26
27
28
29
30
31
32
33
34
35
36
37
38
39
40
41
42
43
44
45
46
47
48
49
50
51
52
53
54
55
56
57
| {
"version": "2.0.0",
"tasks": [
{
"type": "shell",
"label": "Create BUILD-DIR",
"command": "if (!(Test-Path build)) {mkdir build}",
"detail": "Create new folder \"build\""
},
{
"type": "shell",
"label": "build",
"command": "make",
"dependsOn": "Create BUILD-DIR",
"args": [
"-j8"
],
"detail": "Build with mingw32-make.exe"
},
{
"type": "shell",
"label": "Clean",
"command": "rm",
"args": [
"-r",
"build"
],
"detail": "Delete folder \"build\" and its content"
},
{
"type": "shell",
"label": "run",
"command": "openocd",
"args": [
"-f",
"interface/stlink-v2.cfg",
"-f",
"target/stm32f4x.cfg",
"-c",
"program ${workspaceFolder}/build/${workspaceFolderBasename}.elf verify reset exit 0x08000000"
],
"detail": "Burn with OpenOCD"
},
{
"type": "shell",
"label": "OpenOCD",
"command": "openocd",
"args": [
"-f",
"interface/stlink-v2.cfg",
"-f",
"target/stm32f4x.cfg"
],
"detail": "start OpenOCD and wait for gdb"
}
]
}
|
note: 为了兼容 powershell,在 tasks.json 中多设置了几个任务,首先是创建 build 文件夹,,然后是清除编译文件等等
- ! 使用 cortex-debug 插件的话就不用在此处配置烧录程序的指令了
比如我使用的芯片型号为 stm32f407zgt6,使用的调试器为 stlink-v2,那么最终的配置文件命令就可以写为 -f interface/stlink-v2.cfg -f target/stm32f4x.cfg,如果是官方板也可以直接在 board 里找,比如 -f board/stm32f4discovery.cfg。
而 -c 的参数既然是烧录操作的指令那么就是:program build/_NAME_.bin verify reset exit 0x08000000,其中 _NAME_ 是你的工程的名字,可以在 Makefile 的 target 属性中查找。
启动文件
此文件中指定在 Vscode 的 运行与调试 中显示的选项,在这里配置一键编译调试的选项,通过 preLaunchTask 和 postDebugTask 来指定运行前和结束后的调用任务,这些所调用的任务就是我们在 tasks.json 中所指定的任务,我们若要调试 arm 工程需要 vscode 安装 cortex-debug 这个插件,而后在其中指定以下属性:
| 属性 |
内容 |
| name |
当前启动配置在 运行与调试 中显示的名字 |
| cwd |
执行命令的目录 |
| executable |
待烧录文件的路径 |
| request |
请求配置类型,可以是 launch 或者 attach |
| type |
指定调试类型,此处对于嵌入式调试来说默认为 cortex-debug |
| servertype |
调试的服务器类型,支持 jlink, openocd, pyocd, pe, stlink,stutil, qemu, bmp and external 此处默认为 openocd |
| device |
设备类型,这个好像不需要具体配置,我目前的配置为板子型号 |
| interface |
调试型号,默认为 SWD,用于 ST-Link,J-Link 和 BMP 等调试器 |
| configFiles |
openocd 烧录时指定的配置文件路径,参照 任务文件 中提到的命令格式 |
| runToEntryPoint |
指定程序的起始函数位置,如果被指定,调试程序将一直指定直到遇见所指定的函数,也称之为入口函数 |
| showDevDebugTimestamps |
当 showDevDebugOutput 属性被允许时,显示时间戳,调试该插件时使用 |
| preLaunchTask |
调试会话开始前要运行的任务 |
| postDebugTask |
调试会话结束后运行的任务 |
| armToolchainPath |
指定 arm 交叉编译工具链所在的位置,此位置应当是 arm-none-eabi-gdb, arm-none-eabi-objdump 和 arm-none-eabi-nm 所在的位置 |
根据表中所述,我在 launch.json 中设置了几个启动配置如下,最终的效果如下图:
1
2
3
4
5
6
7
8
9
10
11
12
13
14
15
16
17
18
19
20
21
22
23
24
25
26
27
28
29
30
31
32
33
34
35
36
37
38
39
40
41
42
43
44
45
| {
"version": "0.2.0",
"configurations": [
{
"name": "Cortex Debug-jlink",
"cwd": "${workspaceRoot}/",
"executable": "${workspaceFolder}/build/${workspaceFolderBasename}.elf",
"request": "launch",
"type": "cortex-debug",
"servertype": "jlink",
"device": "STM32F405RG",
"interface": "swd",
"runToEntryPoint": "main",
"showDevDebugTimestamps": true,
},
{
"name": "Cortex Debug-stlink",
"cwd": "${workspaceRoot}/",
"executable": "${workspaceFolder}/build/${workspaceFolderBasename}.elf",
"request": "launch",
"type": "cortex-debug",
"servertype": "openocd",
"device": "STM32F407ZG",
"interface": "swd",
"configFiles": [
"interface/stlink-v2.cfg",
"target/stm32f4x.cfg",
],
"runToEntryPoint": "main",
"preLaunchTask": "build",
"armToolchainPath": "D:/Scoop/apps/gcc-arm-none-eabi/current/bin",
}
]
}
|
此时点击选中 Cortex Debug-stlink,而后点击左侧的:LiPlay: 按钮就可以运行了,开始愉快的写代码烧板了。
CMake
在配置完基础的管脚,时钟之后,在 Project Manager->Project Settings->Tool Chain 中选择 CMake,如下图所示,而后点击 Generate Code
其余的配置文件,任务文件以及启动文件参考上述介绍进行稍微修改即可,主要是要依靠 CMake 来编译生成 Makefile,而后才能使用 make 命令来执行编译,具体各个配置文件内容如下:
c_cpp_properties.json 配置文件
1
2
3
4
5
6
7
8
9
10
11
12
13
14
15
16
17
18
19
20
21
22
23
24
25
26
27
28
29
30
31
32
| {
"configurations": [
{
"name": "Win32",
"includePath": [
"${workspaceFolder}/**",
"D:/Scoop/apps/gcc-arm-none-eabi/current/arm-none-eabi/include",
"D:/Scoop/apps/gcc-arm-none-eabi/current/arm-none-eabi/include/c++/13.3.1",
"D:/Scoop/apps/gcc-arm-none-eabi/current/arm-none-eabi/include/c++/13.3.1/arm-none-eabi/thumb/v7-m",
"D:/Scoop/apps/gcc-arm-none-eabi/current/arm-none-eabi/include/c++/13.3.1/backward",
"D:/Scoop/apps/gcc-arm-none-eabi/current/arm-none-eabi/include/sys",
"D:/Scoop/apps/gcc-arm-none-eabi/current/lib/gcc/arm-none-eabi/13.3.1/include",
"D:/Scoop/apps/gcc-arm-none-eabi/current/lib/gcc/arm-none-eabi/13.3.1/include-fixed"
],
"defines": [
"_DEBUG",
"UNICODE",
"_UNICODE",
"USE_HAL_DRIVER",
"STM32F407xx",
"__STATIC_INLINE=",
"__NO_RETURN="
],
"compilerPath": "D:/Scoop/apps/gcc-arm-none-eabi/current/bin/arm-none-eabi-gcc.exe",
"cStandard": "c11",
"cppStandard": "c++11",
"intelliSenseMode": "${default}",
"compileCommands": "${workspaceFolder}/build/compile_commands.json"
}
],
"version": 4
}
|
1
2
3
4
5
6
7
8
9
10
11
12
13
14
15
16
17
18
19
20
21
22
23
24
25
26
27
28
29
30
31
32
33
34
35
36
37
38
39
40
41
| {
"version": "2.0.0",
"tasks": [
{
"type": "shell",
"label": "Create Makefile",
"command": "cmake",
"args": [
"-G",
"MinGW Makefiles",
".",
"-B",
"build"
],
"detail": "Create Makefile"
},
{
"type": "shell",
"label": "build",
"dependsOn": "Create Makefile",
"command": "make",
"args": [
"-j",
"8",
"-C",
"build"
],
"detail": "Build with make"
},
{
"type": "shell",
"label": "Clean",
"command": "rm",
"args": [
"-r",
"build"
],
"detail": "Delete folder \"build\" and its content"
},
]
}
|
1
2
3
4
5
6
7
8
9
10
11
12
13
14
15
16
17
18
19
20
21
22
23
24
25
26
27
28
29
30
31
32
33
34
35
36
37
38
39
40
41
42
43
44
45
| {
"version": "0.2.0",
"configurations": [
{
"name": "Cortex Debug-jlink",
"cwd": "${workspaceRoot}/",
"executable": "${workspaceFolder}/build/${workspaceFolderBasename}.elf",
"request": "launch",
"type": "cortex-debug",
"servertype": "jlink",
"device": "STM32F405RG",
"interface": "swd",
"runToEntryPoint": "main",
"showDevDebugTimestamps": true,
},
{
"name": "Cortex Debug-stlink",
"cwd": "${workspaceRoot}/",
"executable": "${workspaceFolder}/build/${workspaceFolderBasename}.elf",
"request": "launch",
"type": "cortex-debug",
"servertype": "openocd",
"device": "STM32F407ZG",
"interface": "swd",
"configFiles": [
"interface/stlink-v2.cfg",
"target/stm32f4x.cfg",
],
"runToEntryPoint": "main",
"preLaunchTask": "build",
"armToolchainPath": "D:/Scoop/apps/gcc-arm-none-eabi/current/bin",
}
]
}
|
其余所有步骤相同即可,此时点击调试就可以愉快的下载程序了。
TI SDK
stdtool.h 文件里注明了当前编译器的版本
core_cmx.h 里调用了 arm_compiler.h
arm_compiler.h 里对编译器的选择进行了兼容,调用对应编译器的 cmsis 文件如 cmsis_armclang.h
cmsis_armclang.h 里调用了 arm_compat.h
arm_compat.h 文件里调用了 arm_acle.h 文件,但此文件有诸多不兼容之处需改正,暂时注释掉